Getting Started With your First rIoT Application
- Rod Nafisi
- Sep 25, 2017
- 3 min read

Before diving into describing different system components in detail, we will go over a simple case to show an end to end scenario. In this example, we create a simulation stream and demonstrate how we can push the data streams to a cloud server. It is assumed that rIoT Explorer is installed on your Windows machine and you have access to a rIoT Engine. Please refer to the other documents describing installation process, if you do not have the applications installed.
TIP: Make sure the Explorer is not connected to the Engine when you go through the following configuration steps. rIoT Explorer does not allow you to change the configuration while connected to the Engine.
[endif]--In this example, we create a simulation device and push data to the M2X cloud service.
Step 1: Start the Explorer
Locate the rIoT Explorer icon on your desktop and navigate to the application in the start menu and run the Explorer.
After Explorer is run, the following splash window appears:

You can choose to start a new project or load an existing project. In this example, we start a new project. To start a new project, you should follow the prompts to choose a location and a name for the project. Once the project is selected, the related folder structure is created automatically
Step 2: Create Client Device and Client Stream
In this step, we add a simulation device and a simulation stream to simulate some values. This is considered a client device and the values will be mapped to server streams in later steps.
Open the Explorer tree, click on the Devices: Clients, right click on Simulation, choose Add Simulation Device as shown below and give it a name

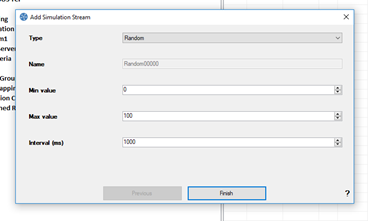
Right click on the created device, select Add Stream, select Random for the type and click Finish. We are now creating a random stream with random values between 0 and 100 changing every 1000 ms.
Go ahead and connect to the target with a right click on the Explorer node in the tree and selecting the IP address of the target.

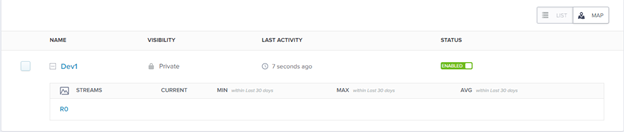
Download the configuration into the target. Verify that the random stream we created is changing: Connect to the Engine and verify the sequence of random values. You need to disconnect in order to continue the configuration steps.

Step 3: Create Server Device and Server Stream
In this step, we create an M2X device and create a server stream. The server stream will receive the client values and saves them in the M2X time series. Please note that the process of creating service streams for other server services is similar.
If you don’t have an account with AT&T M2X, create an account at https://m2x.att.com/ and get the access API keys. Add the key in the explorer: Right click on Devices: Servers, ATT M2X, Configure server, Add the API key and click on Apply API Key:

ATT M2X node should turn green.

Add a device to the server: Right click on ATT M2x and choose add ATT M2X device. If there is no device in the account, rIoT Explorer asks you if you want to add one and add it to the service later. Choose Yes and continue:

Add a stream: Right click on the device created and choose Add stream to add a numeric stream. If this is the first stream for the device, you will be asked if you want to create it and add to the service later. Click Yes and continue

After you add the device and stream in your Explorer configuration, they will be added to the M2X account automatically:
Create an event criterion to qualify the events sent to the service. Expand Event Criteria node, right client on Change In Value, add it and type a name. Make sure you choose standard behavior:

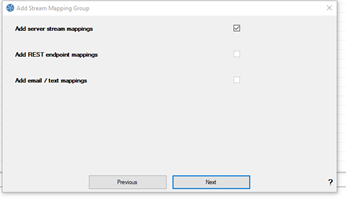
Add mapping: Right click on Stream Mapping Groups, choose Add stream mapping group, type a name, choose the Client device and Client stream and click Next. In the next page, select Add server stream mappings and Click Next: height="212" src="file:///C:/Users/Rod/AppData/Local/Temp/msohtmlclip1/01/clip_image028.jpg" /
Select the Serve device, Server stream and Event criteria and click Finish:

Download the configuration into the Engine: Connect to the Engine and download. Make sure you DO NOT load the configuration from the Engine to the Explorer upon connection. Verify the values are pushed to the server stream: height="279" src="file:///C:/Users/Rod/AppData/Local/Temp/msohtmlclip1/01/clip_image032.jpg" /

Step 4: Final Step
Verify the Data is populating in the Cloud Service:

![endif]--


Comments